
티스토리 뷰
1. pom.xml에 메이븐 레파지토리 추가
(commons-fileupload는 1.3.3ver commons-io는 2.4ver사용)
<!-- commons-fileupload -->
		<dependency>
			<groupId>commons-fileupload</groupId>
			<artifactId>commons-fileupload</artifactId>
			<version>1.3.3</version>
		</dependency>

		<!-- commons-io -->
		<dependency>
			<groupId>commons-io</groupId>
			<artifactId>commons-io</artifactId>
			<version>2.4</version>
		</dependency>
2.설정하기(bean)추가
*요즘에는 xml를 최소화하는 쪽을 지양한다고 한다.
방법1: @Configuration를 사용
(xml에서 만들었던 방식을 자바코드 방식으로 바꾸었다 생각하면 된다)
@Configuration
public class FileConfig {
	@Bean
	public CommonsMultipartResolver multipartResolver() {
		CommonsMultipartResolver mr = new CommonsMultipartResolver();
		mr.setMaxInMemorySize(52428800);// 50MB
		mr.setDefaultEncoding("utf-8");
		return mr;
	}
}
여기서 CommonsMultipartResolver는 리턴타입이다.
파일 업로드 할 때는 bean을 무조건 만들어줘야한다.(핀이 없으면 파일 업로드 처리X)
| setMaxInMemorySize : 파일 업로드 가능한 최대 크기 setDefaultEncoding("utf-8"): 한글 설정 |
@Bean은 리턴하는 값을 bean으로 만들어준다.
방법2: xml사용(servlet-context.xml)
<beans:bean id ="mr" class="org.springframework.web.multipart.commons.CommonsMultipartResolver">
	<beans:property name="maxInMemorySize" value="52428800"/>
	<beans:property name="defaultEncoding" value="utf-8"/>
</beans:bean>
3.컨트롤러 작성, view작성
FileUploadController.java
@Controller
public class FileUploadController {
	@Autowired FileService fs;

	@RequestMapping("form")
	public String form() {
		return "uploadForm";
	}
	@PostMapping("upload")
	public String upload(MultipartHttpServletRequest mul) {
		fs.fileProcess(mul);
		return"redirect:form";
	}
mul.getParmaeter("id")를 하면 값이 잘 넘어오는 걸 확인할 수 있다.
MultipartFile를 사용해야 실질적인 파일에 대한 값을 가져올 수 있다.
MultipartFile file = mul.getFile("file");
String originalName=file.getOriginalFilename();
("file")은 아래의 jsp에서 name="file"이다.
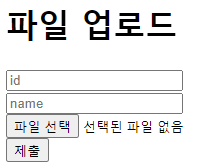
uploadForm.jsp
<body>
<%@ taglib uri="http://java.sun.com/jsp/jstl/core" prefix="c"%>
<c:set var="contextPath" value="${pageContext.request.contextPath }" />
	<h1>파일 업로드</h1>
	<form action="${contextPath }/upload" method="post"enctype="multipart/form-data">
		<input type="text" name="id" placeholder="id"><br>
		<input type="text" name="name" placeholder="name"><br>
		<input type="file" name="file"><br>
		<input type="submit" name="업로드"><br>
	</form>
	<hr>
	<a href="${contextPath }/views">파일보기</a>
</body>
*파일 업로드 할 때는 무조건 POST방식을 사용하고 enctype="multipart/form-data" 를 사용해야한다.
4. 서비스
FileService.java
public interface FileService {
	public static final String IMAGE_REPO ="C:/spring/image_repo";
	void fileProcess(MultipartHttpServletRequest mul);
}
static final로 IMAGE_REPO경로를 고정시켰다.
이 경로는 이미지 저장소로 쓸 것이다.(서버가 있다면 url로 넣기)
FileServiceImpl.java
@Service
public class FileServiceImpl implements FileService {
	@Autowired
	FileMapper fm;

	@Override
	public void fileProcess(MultipartHttpServletRequest mul) {
		ShoesDTO dto = new ShoesDTO();
		dto.setId(mul.getParameter("id"));
		dto.setName(mul.getParameter("name"));

		MultipartFile file = mul.getFile("file");

		if (file.getSize() != 0) {// !file.isEmpty()
			SimpleDateFormat format = new SimpleDateFormat("yyyyMMddHHmmss-");
			Calendar calender = Calendar.getInstance();
			String sysFileName = format.format(calender.getTime());

			sysFileName += file.getOriginalFilename();
			dto.setImgName(sysFileName);

			File saveFile = new File(IMAGE_REPO + "/" + sysFileName);

			try {
				file.transferTo(saveFile);
			} catch (Exception e) {
				e.printStackTrace();
			}
		} else {
			dto.setImgName("nan");
		}
		fm.saveData(dto);
	}
dto의 id와 name에는 바로 getParameter로 받아서 dto에 set하면 된다.
업로드한 파일 값을 처리할때의 기본 틀은 이러했다
| MultipartFile file = mul.getFile("file"); File saveFile = new File(IMAGE_REPO + "/" + file.getOriginalFilename()); file.transferTo(saveFile); |
file 데이터를 file이란 변수에 넣고 file.getOriginalFilename()으로 파일이름을 경로와 합쳐서 저장했다.
| file.transferTo(saveFile); |
transferTo()는 업로드한 파일 데이터를 지정한 파일(경로)에 저장한다는 의미다.
saveFile은 이미지 저장소 경로/파일명.확장자 값이 들어있다.
만약 file의 크기가 0이 아니면 파일을 저장할건데
만약 파일명이 동일하게 들어온다면 최근에 업로드 된 파일로 덮여쓰기가 된다.
			SimpleDateFormat format = new SimpleDateFormat("yyyyMMddHHmmss-");
			Calendar calender = Calendar.getInstance();
			String sysFileName = format.format(calender.getTime());
            sysFileName += file.getOriginalFilename();
그렇기 때문에 업로드 날짜를 format.format(calender.getTime()) 가져와 yyyyMMddHHMMss-형태로 파일 명을 추가해 줄 것이다.
이렇게 하면 파일 업로드 후 저장을 하면 지정 경로에 파일이 잘 들어온다는 것을 확인할 수 있다.
여기서 추가로 파일 업로드 + DB와도 연결을 할 것이다. 그렇기 때문에 if문이 끝나고 나서 fm.saveData(dto); 코드를 넣었다.
5. DB에 파일명 저장
DB에는 파일 명을 저장해줄 테이블을 만들고,
pom.xml에 HikariCP, ojdbc6, spring-jdbc, mybatis, mybatis-spring를 추가해준다.
root-context.xml에는 히카리 커넥션 풀 빈 등록, 히카리 데이터소스 빈 등록, 데이터소스 마이바티스에 등록 및 xml 위치 설정, 마이바티스 xml파일과 dao빈 연결를 해주고 나서 진행한다.
FileMapper.java
public interface FileMapper {
	void saveData(ShoesDTO dto);
}
FileMapper.xml
<?xml version="1.0" encoding="UTF-8"?>
<!DOCTYPE mapper
    PUBLIC "-//mybatis.org//DTD Mapper 3.0//EN""http://mybatis.org/dtd/mybatis-3-mapper.dtd">
<mapper namespace="com.care.root.mybatis.FileMapper">
	<insert id="saveData">
		insert into shoes_image
		values(#{id},#{name},#{imgName})
	</insert>
</mapper>
mapper namespace = "" 이 경로에는 연결할 클래스를 넣고
id에는 같이 동작시킬 메소드명을 넣어주면된다.
'Spring' 카테고리의 다른 글
| [스프링]이메일 보내기 (1) (0) | 2021.11.16 |
|---|---|
| [스프링]업로드한 파일 띄우기,다운로드 기능 (0) | 2021.11.15 |
| 스프링_@RequestParam 간단하게 사용해보기 (0) | 2021.05.25 |
| 스프링_Annotation(@RequestMapping,@GetMapping,@PostMapping)을 이용하여 더 짧고 간단하게 get,Post방식으로 보내기 (0) | 2021.05.25 |
| 스프링_post로 보내기 get으로 보내기 (0) | 2021.05.25 |
- Total
- Today
- Yesterday
- this.
- Expression
- NAV
- span
- 실기
- link href
- div
- application
- Margin
- session
- 자격증
- CLASS
- Declaration
- dl
- 독학
- scriptlet
- RequestDispatcher
- request
- 합격
- id
- jsp
- 정처산기
- padding
- Redirect
- getParameter
- 정보산업처리기사
- 정처기
- pageContext
- forward
| 일 | 월 | 화 | 수 | 목 | 금 | 토 |
|---|---|---|---|---|---|---|
| 1 | 2 | 3 | ||||
| 4 | 5 | 6 | 7 | 8 | 9 | 10 |
| 11 | 12 | 13 | 14 | 15 | 16 | 17 |
| 18 | 19 | 20 | 21 | 22 | 23 | 24 |
| 25 | 26 | 27 | 28 | 29 | 30 | 31 |